Welcome to Gradle for CorDapps! ?
November 06, 2020
This blog is to help Corda developers with some basic features of Gradle for developing CorDapps on the Corda DLT. If you’ve ever peeked through a Gradle script, all the cryptic entries may seem overwhelming at first — but it’s actually not so scary. This is an attempt to demystify some of what’s going on and help you confidently manage your CorDapps.
Note: This brief overview is focused on the most useful knowledge base for productive development. Gradle is a very robust system, so for more advanced topics, please check out the official documentation.
What is Gradle?
Maybe the best answer to this should come straight from the elephant’s mouth (Gradle’s website):
Gradle is an open-source build automation tool focused on flexibility and performance. Gradle build scripts are written using a Groovy or Kotlin DSL. Read about Gradle features to learn what is possible with Gradle.
Corda projects use Gradle scripts to streamline dependency management and build environments, regardless of the operating system, platform, or choice of editor.
When you clone an existing CorDapp project from a repository or create a new one (with a build.gradle script), all you need to build, package, and test your CorDapp will auto-magically download and link to your project during initial synchronization. ?
Let’s get started by looking at build.gradle scripts contained in a simple project template. The code snippets used here are from the cordapp-template-java repository.

cordapp-template-java (Project)
.
├── LICENCE
├── README.md
├── TRADEMARK
├── build.gradle ⬅️ Spec for the entire project
├── clients
│   ├── build.gradle ️️️⬅️ Spec for spring server
│   └── src
├── config
├── constants.properties
├── contracts
│   ├── build.gradle ⬅️ Spec for contracts
│   └── src
├── gradle
├── gradle.properties
├── gradlew
├── gradlew.bat
├── repositories.gradle
├── settings.gradle
├── tree.txt
└── workflows
    ├── build.gradle ⬅️ Spec for workflows
    └── src
Above you can see there are four build.gradle files. Don’t worry; it’s not your eyes going fuzzy — it’s standard to have one top-level specification and then an additional per-module script.
? Cool hint: Before Corda 4.0, many CorDapps would be developed in a single module structure and might only contain a single build.gradle . However, for all modern CorDapps (4.0+) it’s best practice to split your project into at least two modules; contracts including contract and state definitions, and workflows for your flows — so you will generally see at least threebuild.gradle files (root + contracts + workflows).
To understand how these scripts affect and manage the project, let’s take a look first at the root build.gradle, and then one of the module level scripts.
./build.gradle (rootProject)
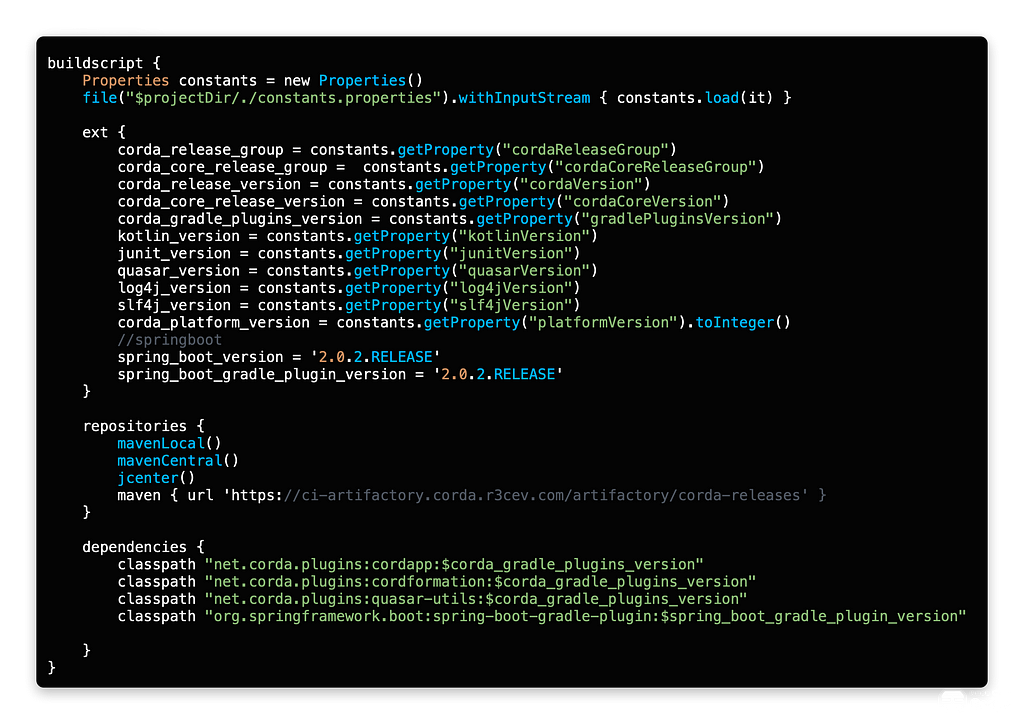
buildscript{…}
The buildscript block defines the dependencies for the build script process:
- ext block specifies the user-defined properties such as the version numbers for Corda, Log4j, Spring, and so on.
Notice that the bottom springboot_xxx entries are hard-coded, but the others are pulling values from a properties file, constants.properties. This importing is useful for managing multiple projects. - repositories block specifies the sources to fetch the dependencies listed in the dependencies block.
- dependencies block specifies the classpath of each required dependency
Standard entries for a CorDapp project will be:
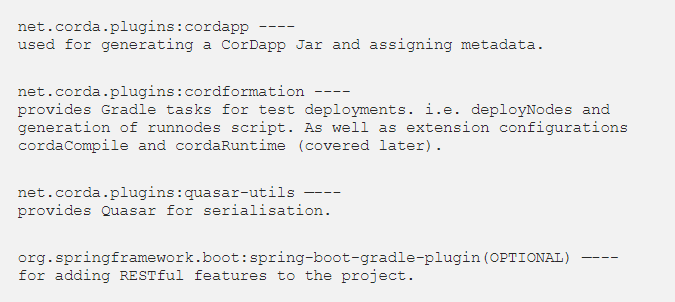
More information on Corda Gradle plugins is available at the official repository.
allprojects{…}
Remember how we have multiple modules in a Corda project, each with their own build.gradle? Well, if you have common settings and properties, you can define them here, and they will inject into all sub-modules, simplifying maintenance of your project.
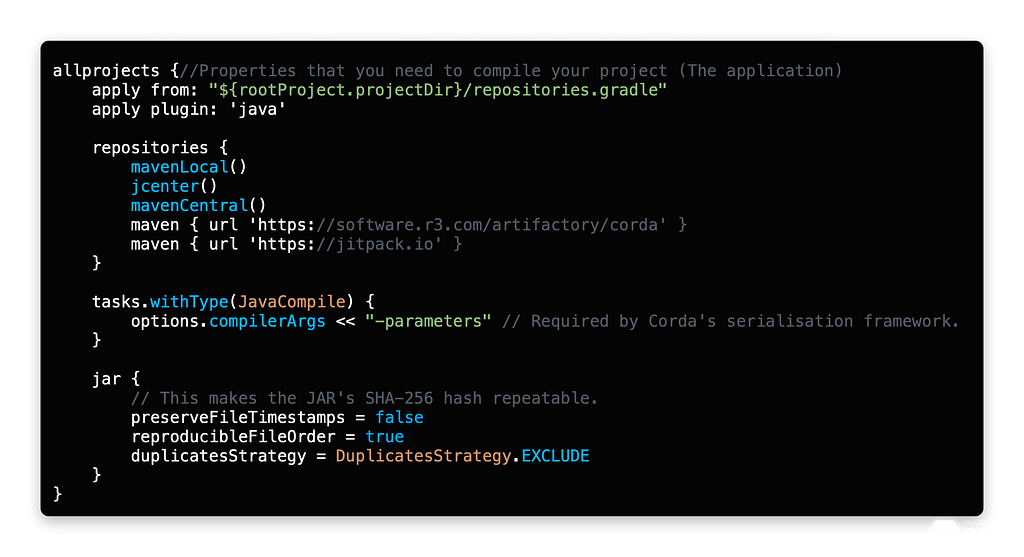
Inside the allprojects block are:
- The apply from statement allows injecting blocks from a separate file. In this case, it’s pulling in an additional repositories{…} block. You can use this pattern for large script blocks that you want to re-use.
- apply plugin: ‘java’ will configure every module to be recognised as Java. Remember: CorDapps can also be fully built with Kotlin; in that case, you would not need to apply this.
- repositories — will make available these sources to all modules
- tasks.withType(JavaCompile){…} allows configuration of all Gradle tasks of the argument type, in this case, JavaCompile. Corda serializes data for both transmissions across the DLT network, and for enforcing integrity in unstable environments (i.e. node availability). The compiler needs to be passed a -parameters arg.
- jar is an optional block here, but in this case, is being used to set properties on the output JAR of each module. This particular entry will enforce that in subsequent builds of contracts.jar and workflows.jar the hash will remain consistent.
Root Project declarations
Below the allprojects block we now have statements that apply to this specific root level. A question worth asking now — if all the project code, you’ve written are in submodules (contracts/workflows), and they have their own build.gradle scripts, then what do the following statements apply to? ?
In the case of our example, they will be used to build and configure the internal Cordform task deployNodes (we will go over this in the next block), which will be compiling and deploying your submodules to a local persistent test network.
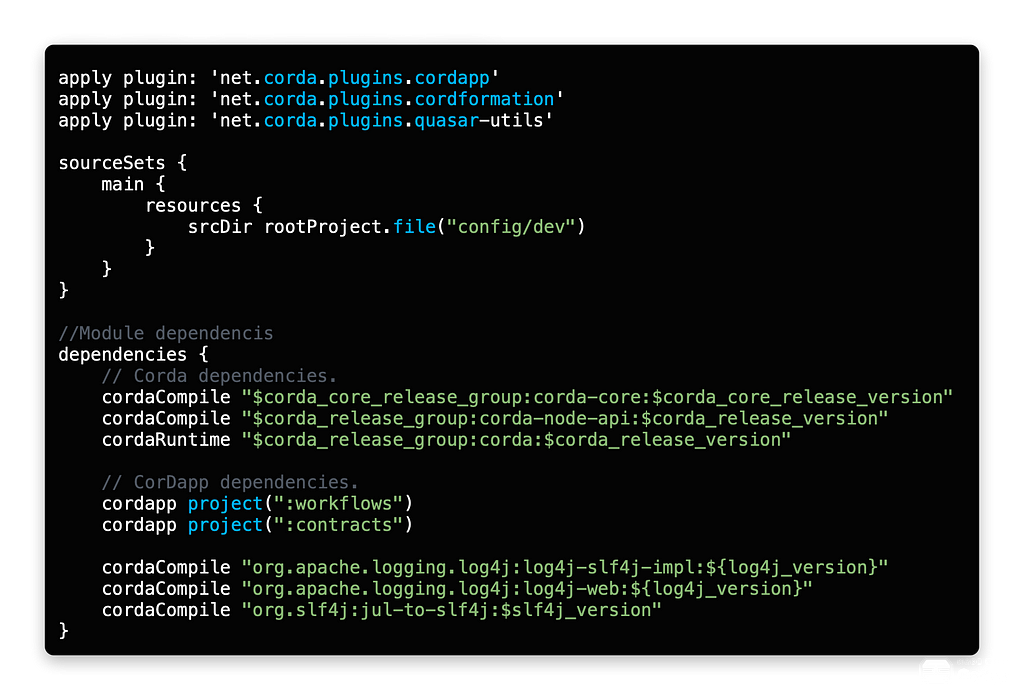
From the snippet above:
- apply plugin: … Remember we defined these plugin dependencies in the buildscript, now we are ‘applying’ or activating them at this scope.
- sourceSets block represents a group of Java and Resource sources or outputs. In many CorDapp projects, resource files define the logging configuration. In this case, if you look into the config/dev you will see a logging xml.
- dependencies These are application-level dependencies for this specific scope/task set, differing from the buildscript/dependencies block, which provided plugins artifacts to facilitate builds.
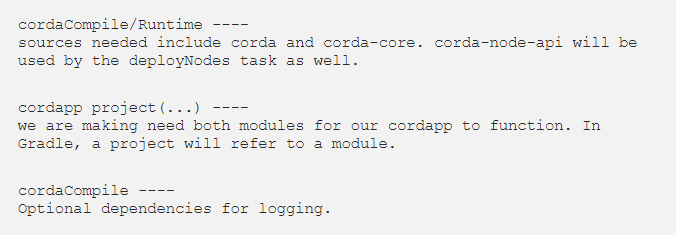
Note:cordaCompile and cordaRuntime are Gradle configurations added by the cordformation plugin, which extend compile and runtime. They indicate dependencies that should not be included in the CorDapp JAR. These configurations prevent a dependency from being included twice (once in the CorDapp JAR/your project, and once in the Corda JARs/platform).
task deployNodes()
Finally, you can see a deployNodes task which is the configuration for local testing during CorDapp development. You can execute this task through your IDE (if it supports Gradle) or by running the command ./gradlew deployNodes from the terminal in your project directory. The task will compile your project, invoke a Network Bootstrapper, and provide you with a runnodes script to boot it all up after.
The network deployed is PERSISTENT. A folder ./build/nodes/NodeX is created for each node defined in the task definition, and vaults and settings will remain until the file structure is either deleted or over-written (usually by either a clean operation or re-executing deployNodes. You can shutdown or restart your nodes as you please.
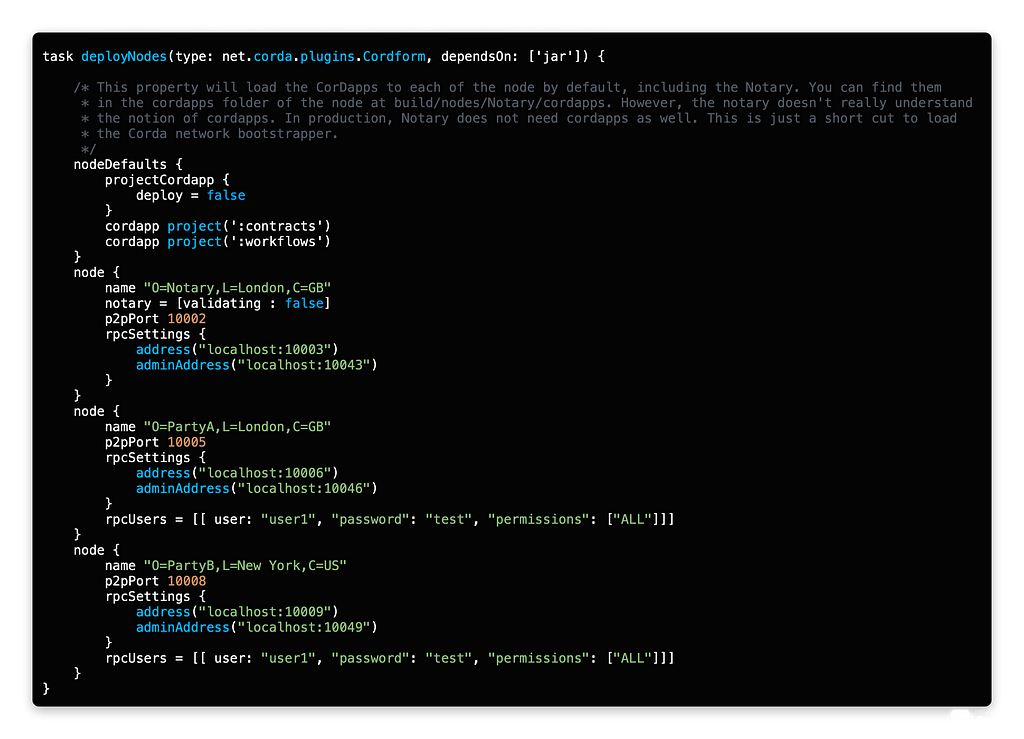
The code above has two basic components:
- nodeDefaults the block allows you to apply settings across all the following defined nodes. In this case, since we have a modular structure to this project we said ‘do not deploy the full project’, then give all nodes the CorDapp JARs contracts and workflows ← we now have access to these because we defined them as dependencies in the previous section. ?
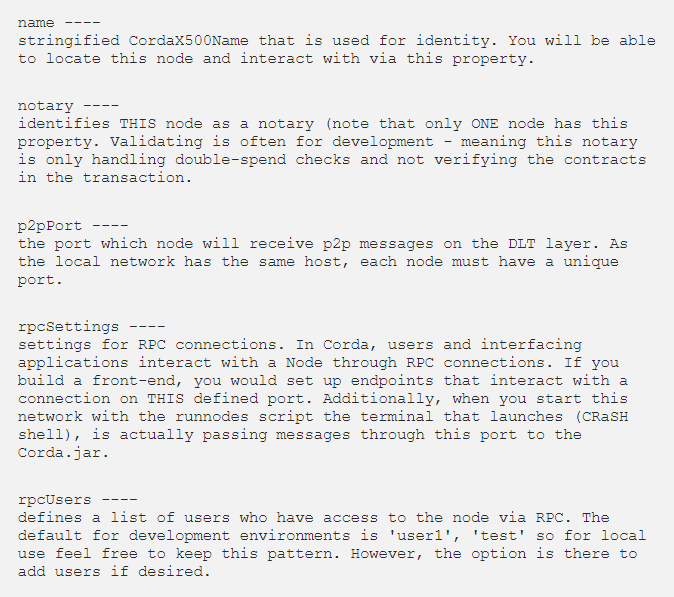
- node block represents an individual Corda node on our mock-network. We can create as many of these as we like (up to our available resources). A good starting point is to have at least 3 — a notary and two counter-parties.
That’s it for the root level build.gradle. Just to recap, the project level script defined plugins and build parameters. It then had a block where we could save time and apply properties to all the submodules in the project.
Next, we set up dependencies and declarations for a task in this script called deployNodes(). This task made use of some libraries and also used the TWO submodules contracts and workflows. Woot woot! ?
We’re now well on our way to becoming Gradle masters! The only thing left to discuss is how to configure and read a MODULE level build.gradle scripts. In many cases, there will be similarities — let’s start with the contract module. Then we will trace through the workflows, as it’s the ‘slightly’ more complicated case — but we can master it, don’t fret!
./build.gradle (contracts module)
Let’s do all of the source at once since we are more familiar now with the different blocks.
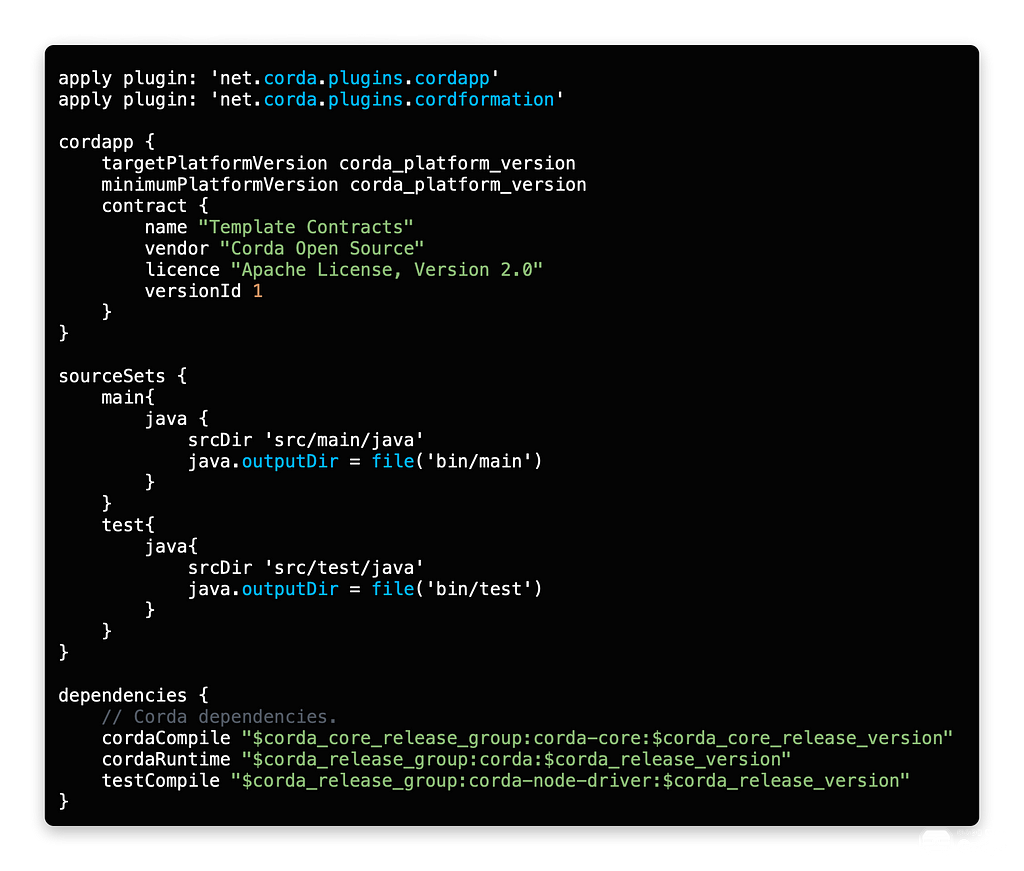
- apply plugin: … makes available to this module a couple of the Gradle plugins we defined in the buildScript of the root. Namely, cordapp for generating the JAR and cordaformation to give us the cordaCompile/Runtime configurations.
- cordapp block defines meta-data that the cordapp plugin is able to utilize and inject into the app. The name, vendor, licence, and versionId you will be interested in changing.
- sourceSets block was used in the root build.gradle to define logging configs. Here we only used it to define src and output directories. We do not introduce logging into this module as we are not running flows/execution logic from this module. That will be workflows.
- dependencies again, application-level dependencies for tasks or builds in this specifc scope/module. We have corda-core and corda and a corda-node-driver artifact for module testing.
./build.gradle (workflows module)
Next, we have the workflows module, which is very similar to the contract script. It includes some specific additions related to testing or the execution of Corda FlowLogic.
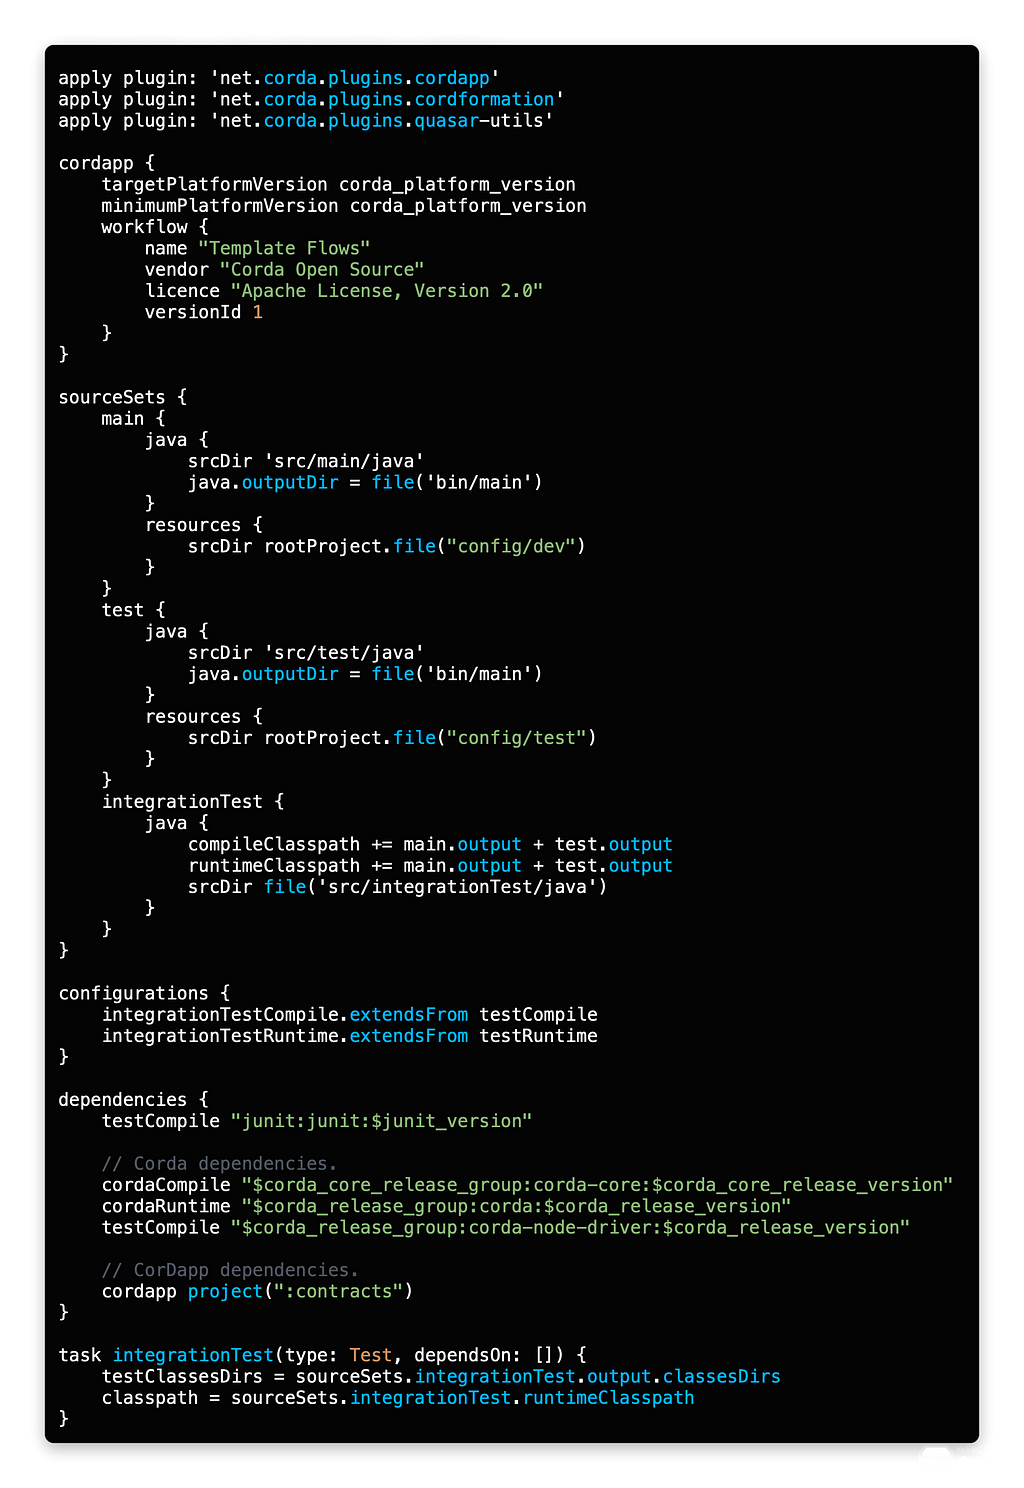
- apply plugin: … makes available to this module the Gradle plugins, additional to the contracts module we have quasar-utils since the contained flows will implement checkpoint and serialisation.
- cordapp block again for meta-data
- sourceSets In this module, there is a little more going on. First, we see that src dirs (java and resources) are now explicitly set for the main and test submodules. Additionally, we have added an integrationTest submodule which defines its classpath as a UNION of both main and test modules.
- configurations — A configuration in Gradle represents a group of artifacts plus dependencies. Because we have defined an additional submodule and task, integrationTest; this block is now inheriting the artifacts from the base testCompile and testRuntime configurations.
- dependencies — corda-core and corda additionally, when we create flows we will reference states and contracts and so we have cordapp project(‘:contracts’) which will include that module as a dependency.
❗️Important: Gradle doesn’t allow circular dependencies. In Corda design, flows will orchestrate usage of the contracts module, but rarely the other way *— you would NOT put project(‘:modules’) in your ./contracts/build.gradle, that would introduce a dependency cycle.
- task integrationTest() defines a new Gradle task which can be executed by the command ./gradlew integrationTest and will run the tests defined in the submodule.

Quick side note about testing
You will have noticed a lot of configuration in the workflows module revolved around integrationTest. These are optional and provided in the template to make things easy for developers. If you create your build.gradle from scratch you could omit this module if you intend to rely on deployNodes; additionally, you may also choose to merge your integrationTest classes and unit test classes in the same module — and again would avoid the additional scripting. Learn more about testing here.
In general, there are three primary methods to test your CorDapps in a local environment (of course there are more but these are most common).
- Local Cordform network (deployNodes/runnodes) — persistent and individual running corda.jars
- MockNetwork/MockServices test frameworks — in memory testing which brings up subsets of Corda network for unit testing etc.
- DriverDSL — integration testing/in memory. DriverDSL creates a non-persistent test-network through a driver instance. Nodes will expose RPC ports and availability similar Cordform for the duration of the driver execution.

Extending Dependencies for Corda SDKs
Suppose you want to add an advanced tooling package such as confidential-identities , accounts , or tokenSDK to your project. You will need to add the dependencies accordingly to the relevant modules. Shown below is an example of additional dependencies. Full instructions on utilising the Accounts or TokenSDK libraries and required dependencies are available at docs.https://corda.net.

Running Gradle Tasks / Operations
Now that you have your project set up the way you want, it’s time to think about running tasks or compiling or building, and generally making use of your project. Here’s how:
IDE
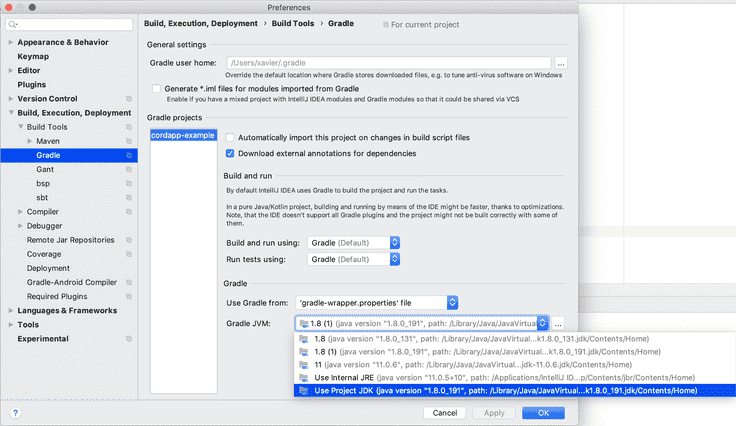
If you are on an IDE such as IntelliJ, which includes built-in Gradle support, there will be a tab on the right menu bar. You can execute tasks from the expandable menu.
Additionally, running through code blocks or default IDE operations can be set to go through Gradle without a run-configuration. To do this, set your Build/Run/Test operations for the project to Gradle — as shown in the screenshots below.

Command Line
To utilize Gradle through the command line, the entry is ./gradlew from within your project directory. Here are some common commands:
./gradlew build — builds the project, including submodules and runs tests.
./gradlew clean — deletes build files
./gradlew bootJar — creates a JAR
./gradlew test— runs all tests. (Optional: — tests “<package.class>” will run a single test class).
./gradlew clean deployNodes — chains a clean command with a deployNodes task.
./gradlew tasks –all — lists all available tasks in the project.
./gradlew workflows:bootJar — prefixing a task with a module name will execute it ONLY relative to that module.
Above is just a sampling, check out the official Gradle user guide for more.
Congratulations on learning Gradle for Corda!
You’ve now acquired the knowledge needed to manage and work with both simple and complex Corda projects managed by Gradle. By taking a few minutes to work through this blog post, you have likely saved A LOT of time staring at build.gradle files in awe and wonder. When I first started with Corda the dependency management was one of the most confusing areas to learn.
However, after some simple guidance, Gradle becomes a joy to use. And who doesn’t love elephants? ?
If you would like to level up even more and get techniques and instruction on how to make your envisioned CorDapp project a reality. Your next stop should be to visit the free online Corda training.
Hope you’ll feel inspired to share this post with your friends and drop me a line sometime, I’d love to hear what you’re working on!
Want to learn more about building awesome blockchain applications on Corda? Be sure to visit https://corda.net, check out our community page to learn how to connect with other Corda developers, and sign up for one of our newsletters for the latest updates.
This article was written with input and ideas from Peter Li, a Developer Evangelist at R3. Follow him for even more great Corda content.
— Anthony Nixon is a Developer Evangelist at R3, an enterprise blockchain software firm working with a global ecosystem of more than 350 participants across multiple industries from both the private and public sectors to develop on Corda, its open-source blockchain platform, and Corda Enterprise, a commercial version of Corda for enterprise usage.
Follow Anthony on Twitter and Linkedin.
Welcome to Gradle for CorDapps! ? was originally published in Corda on Medium, where people are continuing the conversation by highlighting and responding to this story.
